Introduction
~2 min
How to use this guide
Keep this training open in one browser tab and your owner console in another. Follow each lesson in order, or jump from the menu when you need a specific task.
Side-by-side workflow: Pin this tab, open
Owner login in a second window, and work through each step at your own pace. No quizzes — just do the work in your shop as you read.
What you’ll set up
- Look & shop — name, logo, and a theme, before the rest of the menu.
- Services & staff — your menu and who clients can book.
- Imports — optional CSV migration from another platform.
- Payments — Authorize.Net, Stripe, Clover, or Square for client charges.
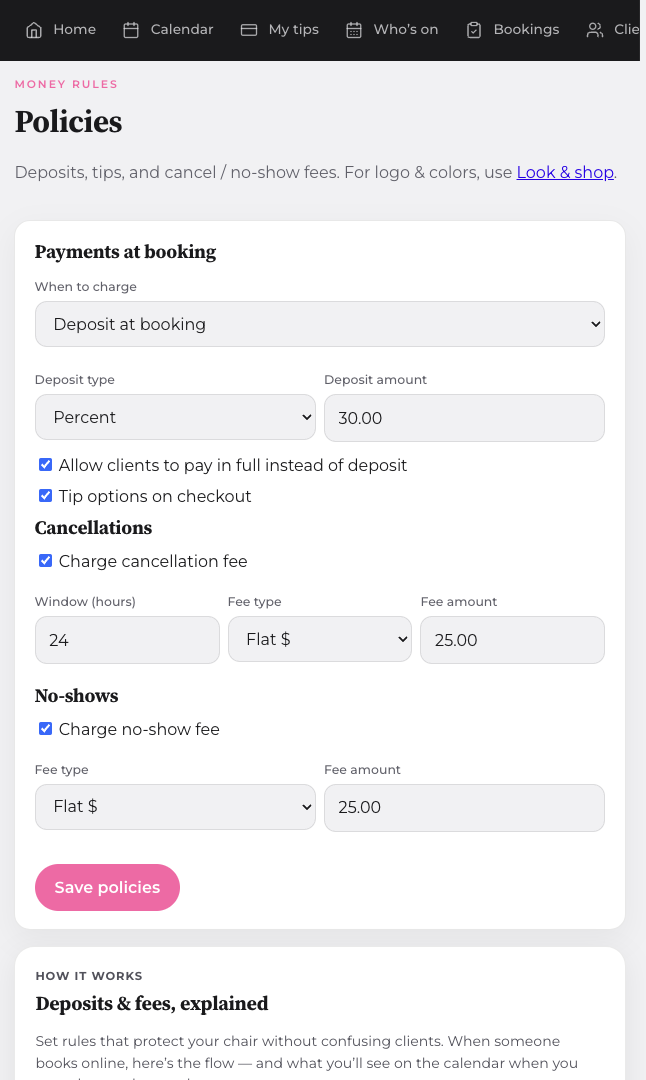
- Policies & link — deposits, cancellation rules, and your book URL.
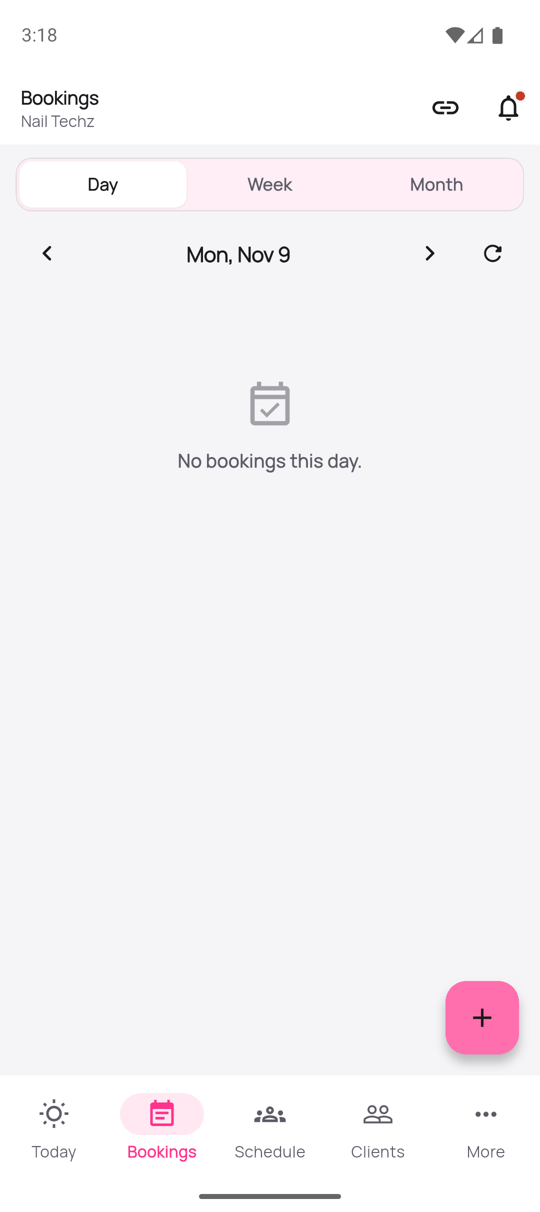
- Mobile apps — owner app on iPhone and Android.
Getting started
~3 min
First login
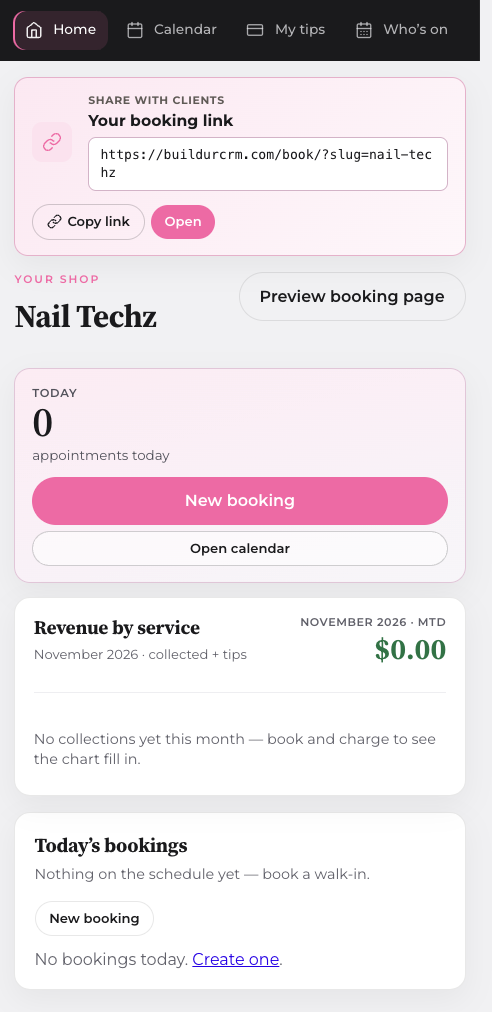
After onboarding, you’ll land in the owner console — your shop’s command center for calendar, clients, payments, and settings.
- Go to Owner login and sign in with the email you used at signup.
- On Home, check today’s appointment count and month-to-date booked revenue.
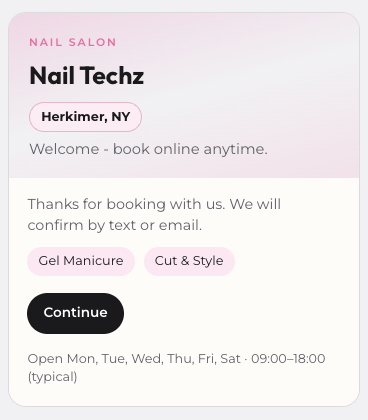
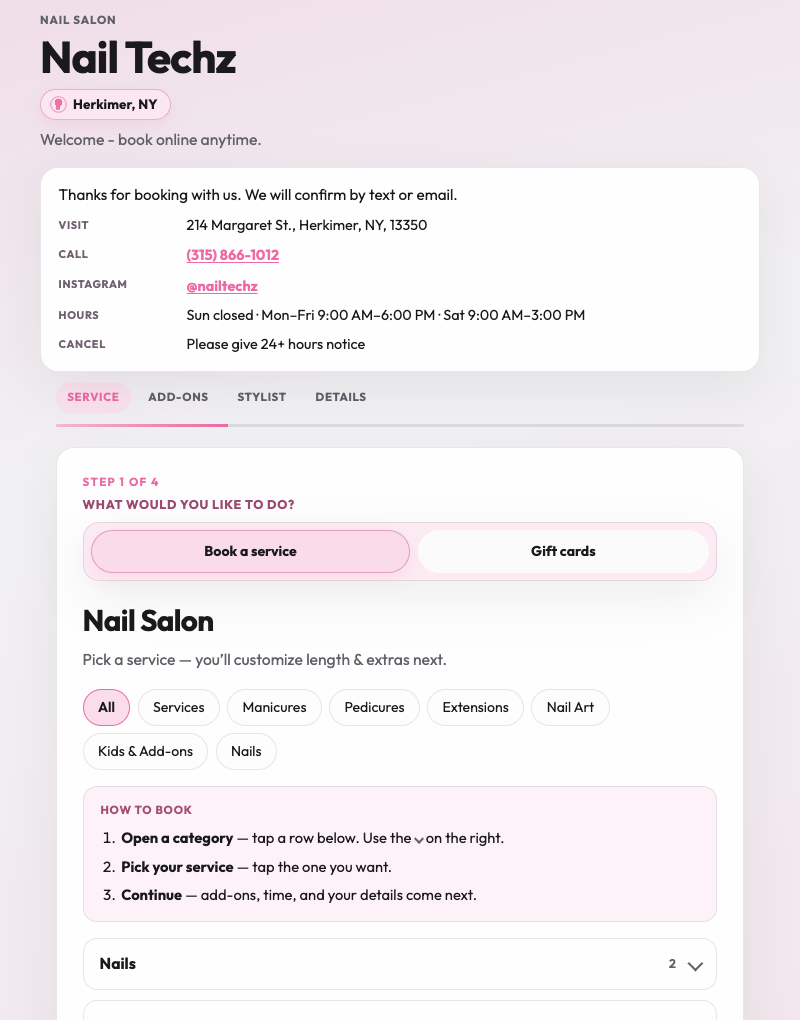
- Use Preview booking page (top right) to see what clients see — it opens your public book link.
- If you see a payment banner, that’s normal until you connect a processor in Settings → Payments.
Branding
~6 min
Look & shop
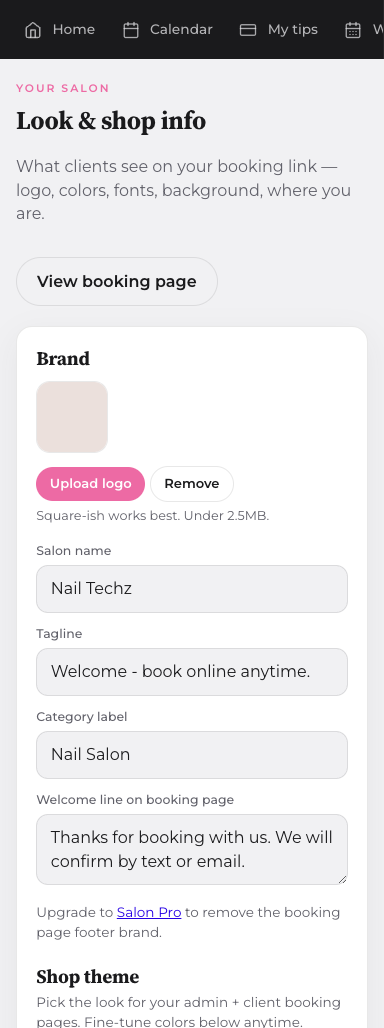
Do this before the service menu. The name, logo, and theme are what clients see on the booking page, and the same theme colors the owner console.
- Open Look & shop.
- Upload a logo, then set the salon name, tagline, category, and the welcome line on the booking page.
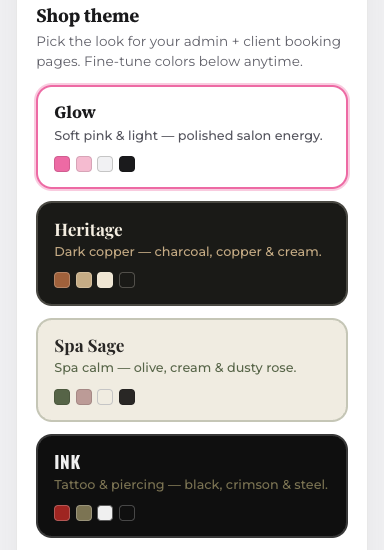
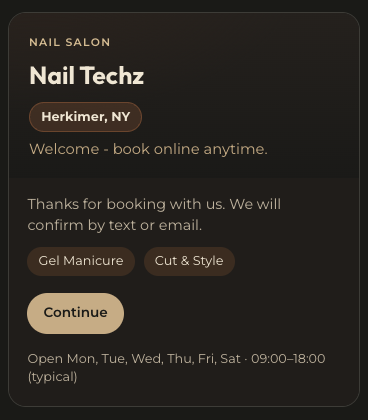
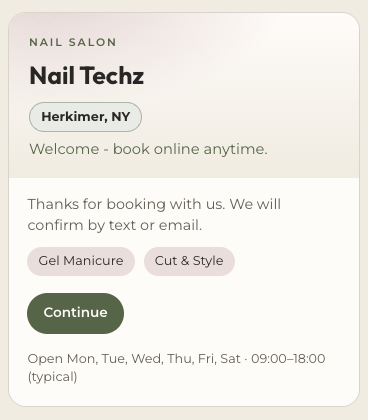
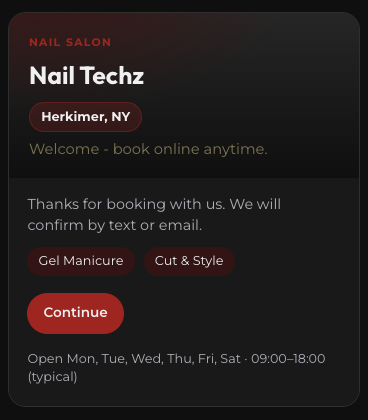
- Under Shop theme, tap Glow, Heritage, Spa Sage, and Ink. The booking card updates as soon as you tap — nothing is public until you save.
- Fill in Find us (address, phone, Instagram) and the hours clients should see.
- Press Save look & info, then open View booking page and confirm the theme you picked.
Glow — soft pink, salons and nails. Heritage — dark copper, barbers. Spa Sage — olive and cream, spas. Ink — black and crimson, tattoo studios. Tap one, check the card, then save.
Console basics
~4 min
Navigate the menu
The left sidebar is your map. Day-to-day work lives up top; catalog, promotions, and settings group below.
HomeDashboard & today’s book
CalendarSchedule & new bookings
BookingsList & search
ClientsCRM & history
ServicesMenu & pricing
StaffTeam & bookable techs
PackagesPrepaid bundles
MembershipsRecurring plans
Look & shopTheme & branding
PoliciesDeposits & fees
PaymentsGateway keys
ReportsRevenue & export
ImportCSV migration
Solo artists: Some team items (Staff, Packages) hide automatically — you still get Locations for work spots and salon links.
Catalog
~5 min
Add a service
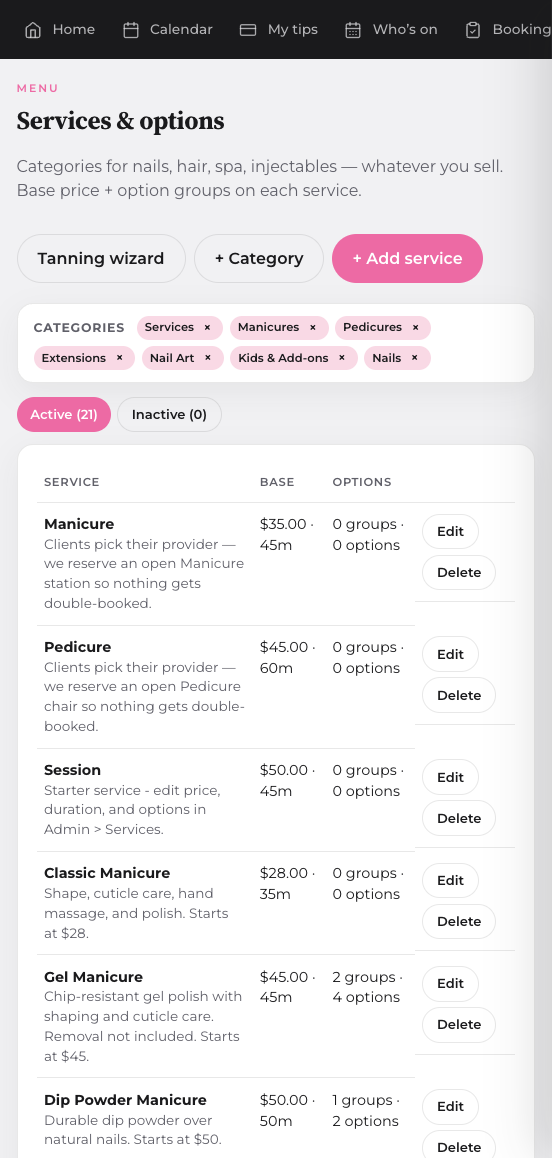
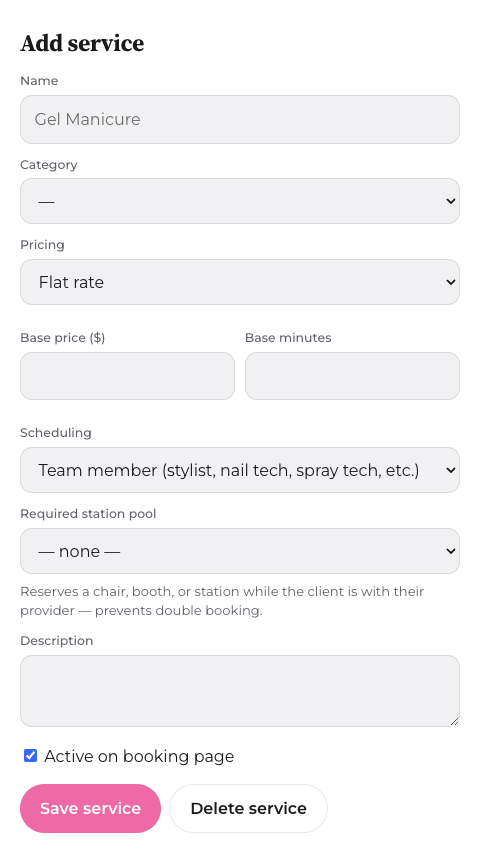
A service is one thing a client can book: a name, a category, a price, and how long it takes. Options, a manicure with a pedicure, and holding a chair come in the next lessons.
- Open Services.
- Click + Add service.
- Name it the way a client asks for it. “Gel Manicure” is the name on the booking page and the receipt.
- Pick a Category, such as Manicures or Pedicures. Categories group the menu. Use + Category if you need a new group.
- Leave Pricing on Flat rate for a set price. Use Hourly only when the total is a rate times the hours the client chooses.
- Enter Base price and Base minutes. The calendar holds the chair for those minutes.
- Leave Scheduling on Team member. Leave Required station pool on none until you are ready to hold a specific chair.
- Add a short Description if clients need it. Keep Active on booking page checked.
- Click Save service. The service shows on the Active list. Option groups appear under the form after the first save.
Importing a full menu from CSV? Skip ahead to
CSV imports, then return here to tweak individual services.
Catalog
~5 min
Add options
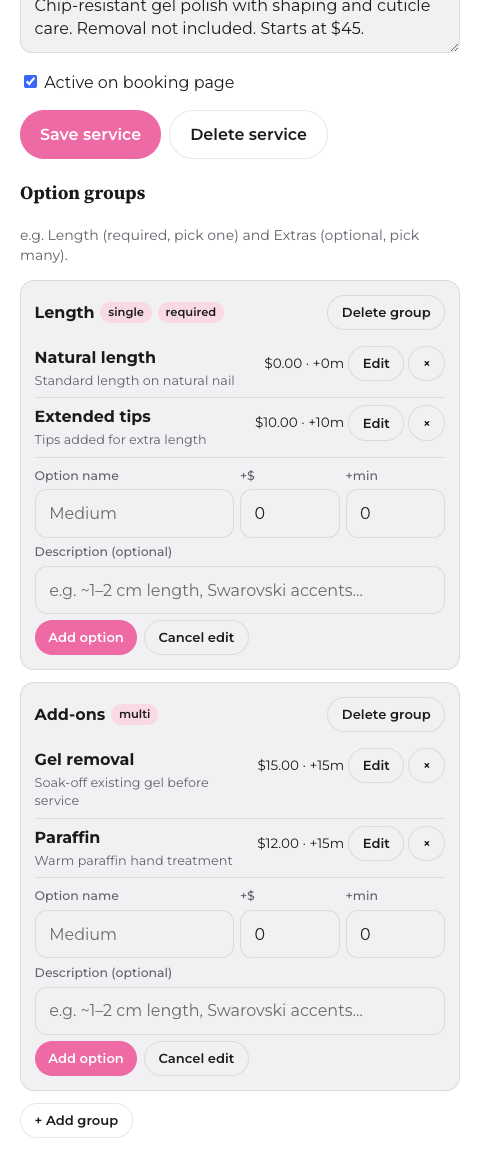
Options are the choices on top of the base price: length, polish, removal, paraffin. A group is the question. An option is one answer.
- Open Services and click Edit on a service you already saved. Gel Manicure is the example below.
- Scroll under Save service. Option groups appear only after the first save.
- Click + Add group. Name the question the way a client hears it, such as Length or Add-ons.
- The next prompt asks if clients may pick more than one. Choose yes for add-ons they can stack. Choose no when they pick one, such as length or polish finish.
- The prompt after that asks if the group is required. Required means they cannot continue until they choose.
- Under the group, type the option name, the price change (+$), and any extra minutes (+min). $0.00 and +0m means it is included in the base price. A description is optional.
- Click Add option. Repeat for each answer in that group. Use Edit on an option to change it. Use × only when you mean to remove it from the booking page.
Add one group and at least two options on a service clients already book.
Open Services ↗
Booking
~4 min
Manicure and pedicure together
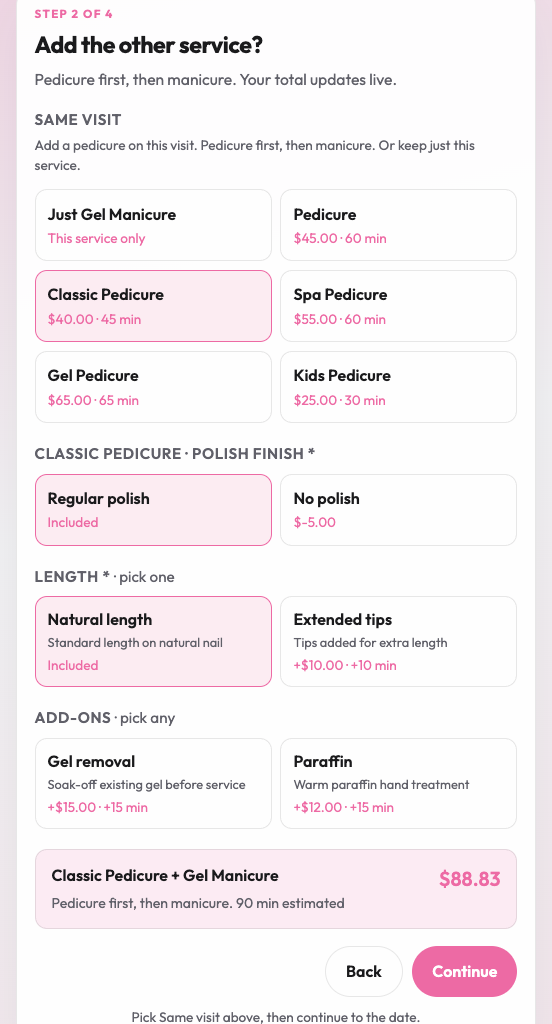
A client can book a manicure and a pedicure as one visit. Pedicure runs first, then the manicure, with the same provider. Each chair is held only for its own part of the visit.
- The service name needs to say what it is. A name with “pedicure” pairs with a name that has “manicure,” and the other way around.
- On the booking page the client picks one of them, then the next step asks Add the other service?
- Same visit lists the matches. Just this service keeps the one they already picked.
- When they add the other service, both sets of options show on that step. The total and the minutes update together.
- The summary names both services and says pedicure first, then manicure. They pick a provider and a time for the whole visit. Nothing is booked until they finish their details.
Chairs: The pedicure holds a pedicure chair for its minutes. The manicure holds a manicure station for its minutes. Set those pools in the next two lessons.
Catalog
~3 min
Hold a chair
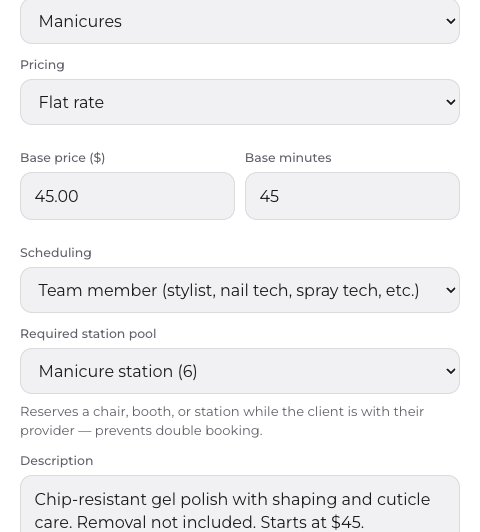
The client still picks a person. The station pool holds an open chair for that service so two bookings cannot take the same one.
- Open Services and click Edit.
- Leave Scheduling on Team member. Equipment-first is for a different setup, such as a client picking a tanning bed with no provider.
- Set Required station pool to the chair this service needs. A gel manicure uses Manicure station. A pedicure uses Pedicure chair.
- The number in parentheses is how many of that chair the shop has. Manicure station (6) means six clients can be in those stations at once.
- Click Save service. Leave the pool on none only when the service does not need its own chair.
Scheduling
~4 min
Add equipment
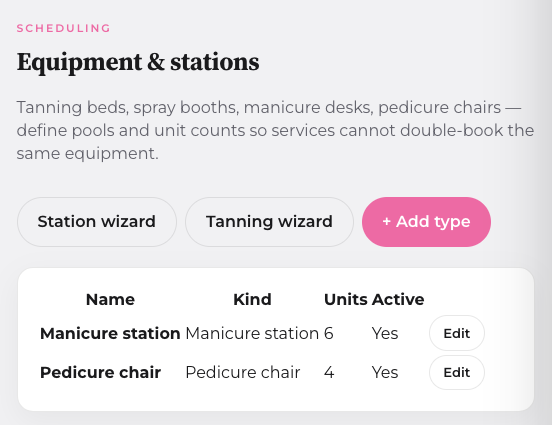
A pool is one kind of chair and a count of how many you have. Services point at a pool. The calendar assigns an open unit.
- Open Equipment.
- Each row is a pool: the name, the kind, how many units, and whether it is active.
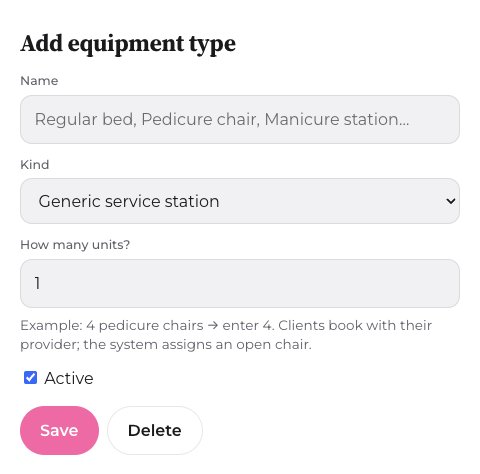
- Click + Add type.
- Name it the way the shop says it. Pedicure chair and Manicure station are the usual nail pools.
- Set Kind to Manicure station or Pedicure chair. Kind is what lets those two services share one visit. The form opens on Generic service station — change it before you save.
- How many units? is the number of those chairs on the floor. Four pedicure chairs means you enter 4.
- Leave Active checked and click Save. Delete removes a pool you opened with Edit. While you are adding, click Save. Then set Required station pool on the services that use it.
Team
~6 min
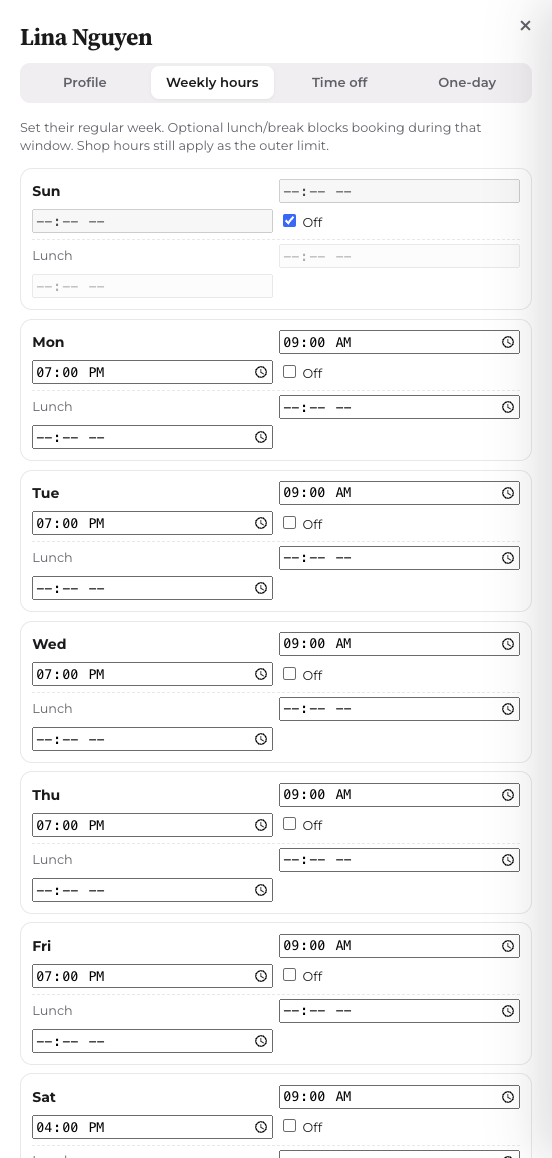
Add and edit staff
A bookable person has a name, a title, the services they perform, and a weekly schedule. Front desk stays on the team without showing on the booking page.
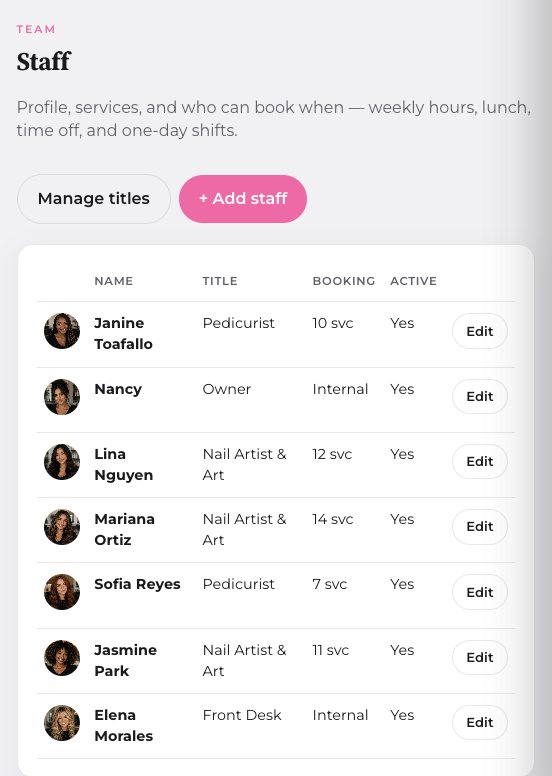
- Open Staff. The list shows the title, how many services they offer, and whether they are active. Internal means clients cannot book them.
- Click + Add staff for someone new, or Edit to change a person who is already here.
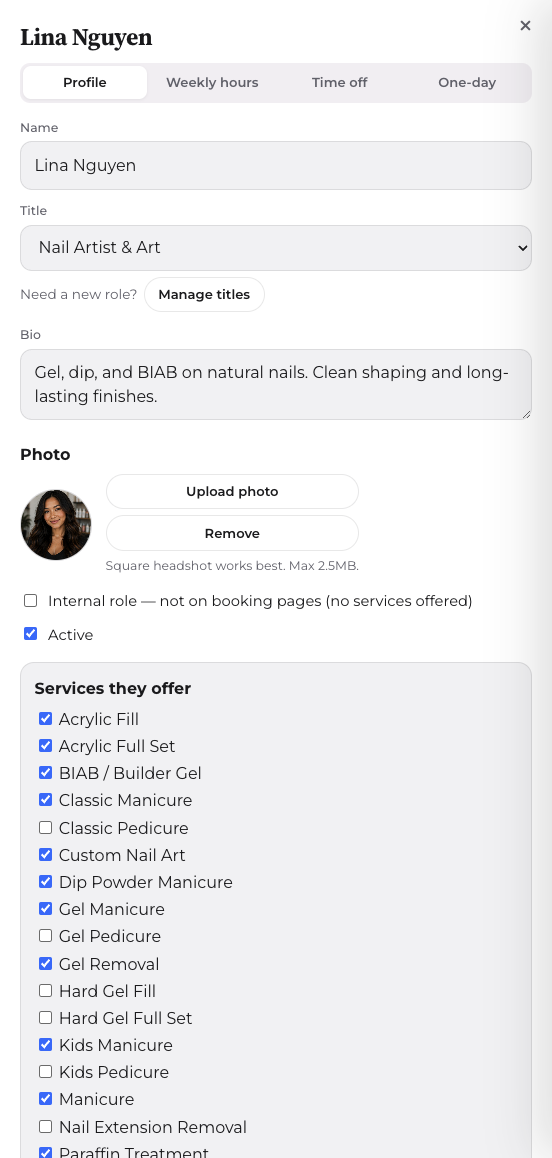
- Enter the name. Pick a Title clients will see. If the role is missing, use Manage titles and add it once. Everyone picks from that list.
- Check Services they offer. Only checked services can be booked with this person, online or at the desk.
- Leave Internal role unchecked for anyone clients should book. Check it for front desk and other support. They stay on Who’s on and off the booking page.
- Keep Active checked. Turn it off for leave when you want to keep their history. Upload a square photo if you have one.
- Click Save profile. The weekly hours tab is available after the person exists.
- Open Weekly hours. Set start and end for each day they work. Check Off for days they never work. Lunch blocks the middle of the day. Click Save weekly schedule.
- Time off is a vacation or a partial day. One-day changes a single date without rewriting the week.
Add each person clients can book, check their services, and save a week.
Open Staff ↗
Migrate
~6 min
CSV imports
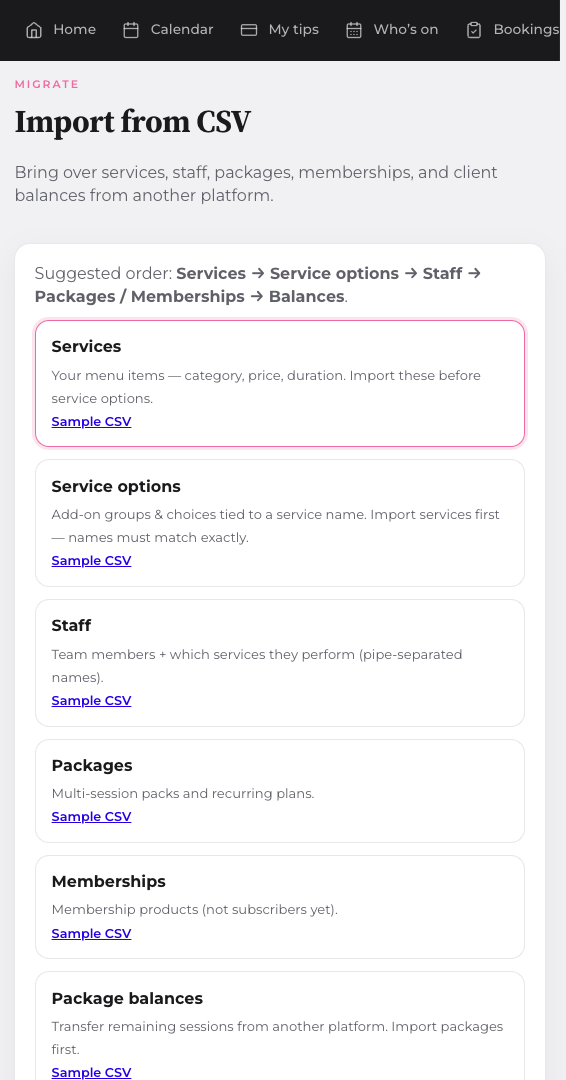
Moving from Square, Boulevard, Mangomint, or spreadsheets? Use Import to bulk-load catalog and balances — or stay manual if you’re starting fresh.
Suggested import order
- Services — your menu items and base prices.
- Service options — variants tied to parent services (highlights, add-ons).
- Staff — team roster and emails.
- Packages / Memberships — if you sell prepaid bundles or recurring plans.
- Balances — client package or gift-card balances (when exported from your old system).
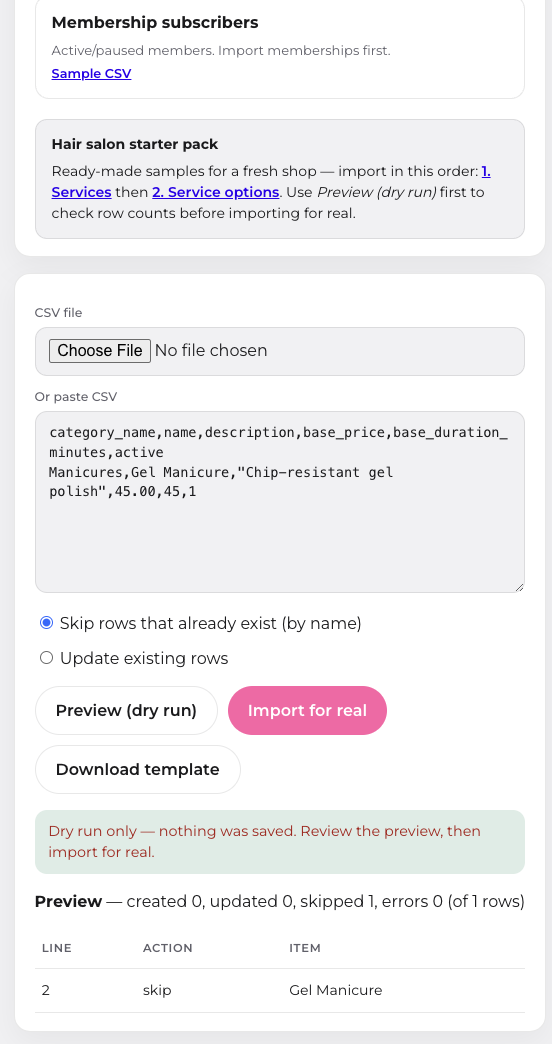
Always run Preview (dry run) first. It shows row counts and errors without writing to your live shop.
Manual vs import
Manual is best for a new shop or under ~15 services. Import wins when you’re migrating hundreds of rows or client balances. You can mix both — import the bulk, then edit individual items in Services or Clients.
Download sample CSVs from Import, or export from your current software.
Open Import ↗
Payments
~5 min
Card payments
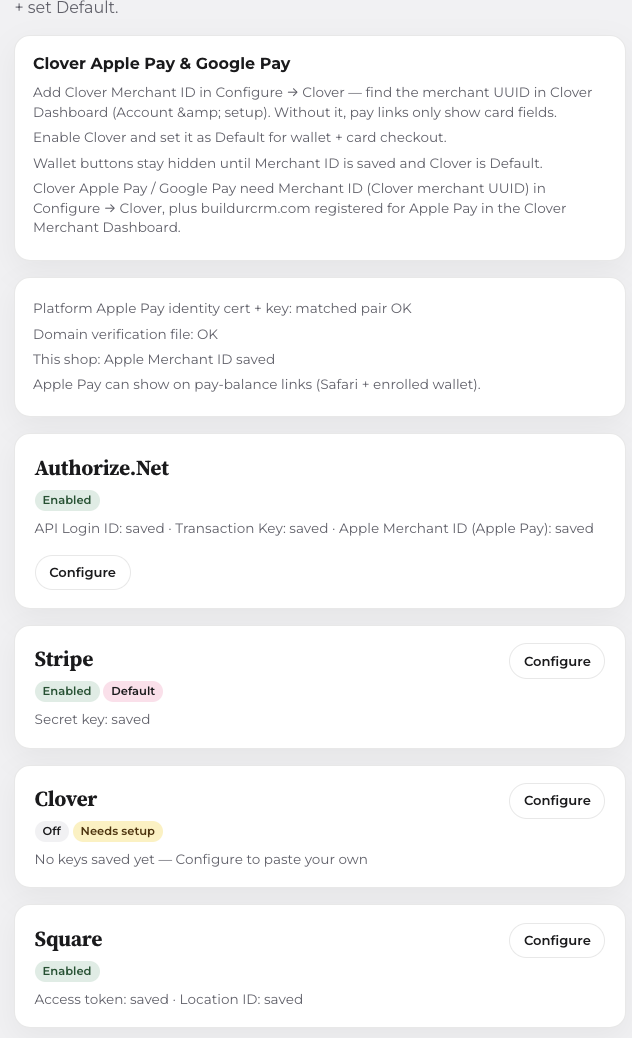
Client card charges run through your merchant account — Authorize.Net, Stripe, Clover, or Square. buildurcrm does not skim service revenue or tips.
- Open Settings → Payments (or Payments in the sidebar).
- Choose your processor and paste the API keys from that processor’s dashboard.
- Run a test charge or sandbox transaction if your processor offers one.
- Enable deposits on services in Policies once payments are connected.
- For Venmo / Cash App / Zelle, use external pay links — staff mark paid manually in calendar.
Your buildurcrm subscription (monthly plan) is separate from client payments. Plan billing is charged at signup. Client checkout uses the processor you configure here.
Booking
~4 min
Policies & booking link
Set deposit rules, cancellation windows, and no-show fees — then share your public book URL everywhere clients find you.
- Open Policies. Set when to charge, the deposit (percent or flat dollars), the cancel window in hours, and the cancel and no-show fees.
- Copy your booking link from Home or the booking-link bar (e.g. buildurcrm.com/book/?slug=your-shop).
- Add the link to Instagram bio, Google Business, website, and front-desk signage.
- Test a booking yourself — pick a service, time, and (if enabled) pay a deposit.
Mobile
~3 min
iOS & Android owner apps
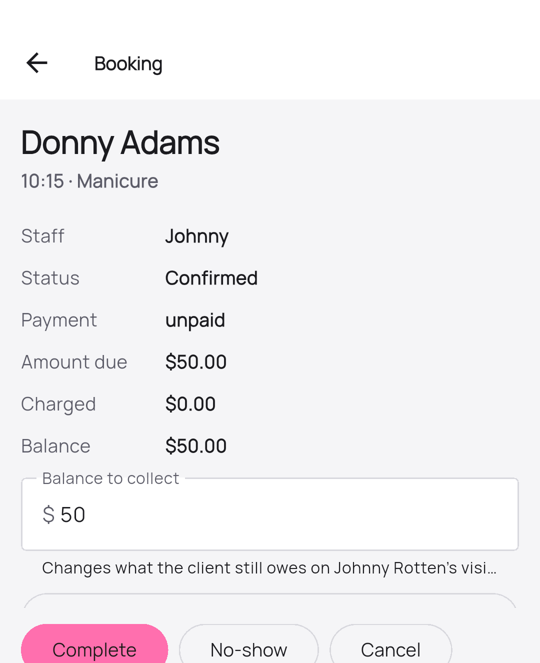
The owner app mirrors the web console — today’s book, walk-ins, collect balances, and push-friendly alerts from the chair or front desk.
- Install from the App Store (iPhone/iPad) or Google Play (Android).
- Sign in with the same owner email and password as the web console.
- Open Bookings. Day is today. Week and Month are beside it.
- Tap a visit. Balance to collect is what they still owe. Update balance saves it. Complete, No-show, and Cancel are on that same screen.
- Web and app stay in sync — a change in either shows up in the other.
Finish line
~2 min
Launch checklist
Before you announce to clients, walk this list once.
- At least one service active and bookable.
- Staff schedule matches real floor hours (or solo hours set).
- Theme & logo look right on the public book page.
- Card processor connected if you charge deposits or pay-in-full online.
- Policies set — clients see deposit and cancel rules at checkout.
- Booking link posted; test booking completed end-to-end.
- Owner app installed on your phone for day-of management.
You’re live. Need help? Email support — we read everything.
Email support